Introduction
Not long after I began experimenting with N Scale trains I was looking for ways to keep my interest up until I could build my dream model railroad. I decided to figure out what could be done in a small space and I heard somewhere about the idea of building layouts on doors; I probably read about it in Model Railroader Magazine. Being the planner type that I am I had already acquired AnyRail(R) track planning software, so I laid out a space 80 x 32 inches, a typical hollow core door size, and began experimenting. An oval would fit; a double oval would fit. Add a crossing and some switches and I had a twice around mainline with the option for two independent ovals that didn’t cross over each other. There was room for several industrial sidings and a two track or more yard. An engine terminal would fit inside an oval. So many ideas! And so The Door Project was born.
The Concept
This project began as an exercise in designing a portable N Scale model railroad that my grandson, his dad, and I could have fun building and operating together. A bonus is that these plans can be built and displayed at train shows by those of you who like to be ambassadors for our hobby!
One of the frustrations of model railroading that I experienced as an adult designing and building large around-the-walls layouts was not getting trains running as quickly as I did as a kid with my HO oval on a 4’ x 8’ sheet of plywood. With an N-scale railroad on a door that frustration is easily avoided.
These layouts are easy to start and quick to get into operation. All that is required is an 80” by 32” hollow core door, a sheet of ¾” foam sheathing, foam safe glue, a drill with a long ½” bit, track, a power pack, and trains! Put the door on a pair of saw horses, cut the foam to fit and glue it down. Lay out the track and drill some holes alongside for your track power and turnout control wires, connect the wires to your power pack following the manufacturer’s instructions, put an engine and rolling stock on the track, plug it in, and you’re in business.
Eventually you’ll want to settle on a track plan, fasten your track to the foam, add some scenery and buildings, perhaps add lighting and signals, and maybe upgrade to Digital Command Control (DCC) so you can easily run more than one engine at a time. You might even add legs to your layout or add some spacers so it can rest on a standard 30” by 72” folding table. If you catch the bug of model railroading for a lifetime you can even connect your door railroad to a bigger room-sized layout.
Standards and Design Criteria
Most railroads can be in operation as soon as the basic track plan is installed. Secondary loops, branch lines and spurs can be added later. As I worked through a variety of design options and discovered what worked and what didn’t I began to formulate some general design ideas and rules I thought would benefit anyone with similar needs. Here are my criteria and parameters.
First, I chose N-Scale, primarily for its ratio of size to scope, but also for its potential for transportability. Most minivans and full size SUVs can easily transport a standard 80” x 32” hollow core interior door, either on edge or laid flat, meeting my transportability criterion. Those same dimensions provide space for more operating possibilities than an HO scale layout that fits on a 4’ x 8’ sheet of plywood, meeting my scope criterion. A few of the more advanced and ambitious plans require a 16-inch extension, making them a full eight feet long. The extension can be made removable or the plan can be built on a plywood sheet that can be separated at it’s midpoint.
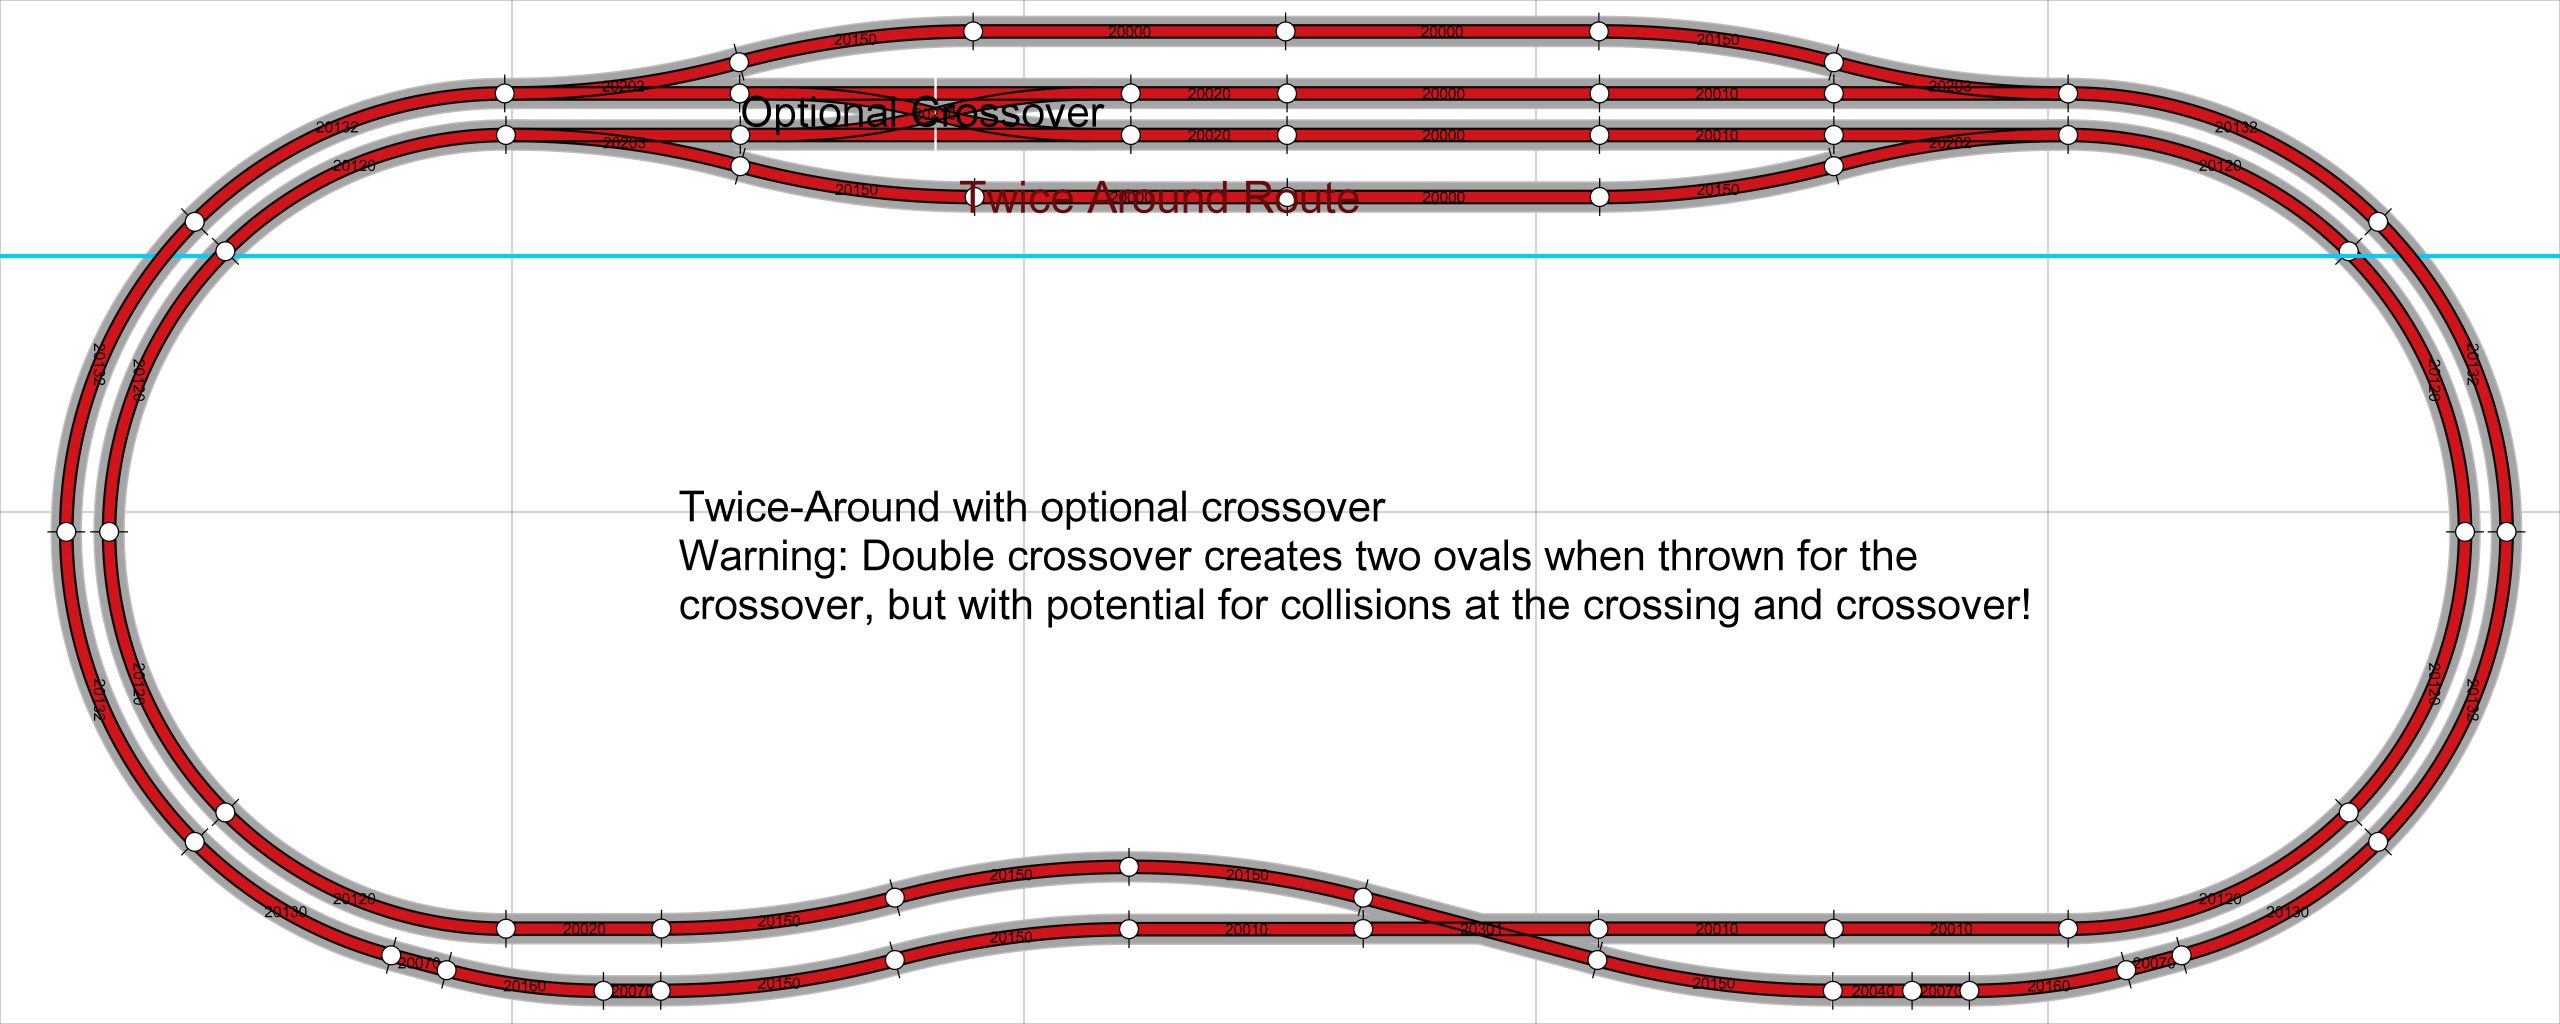
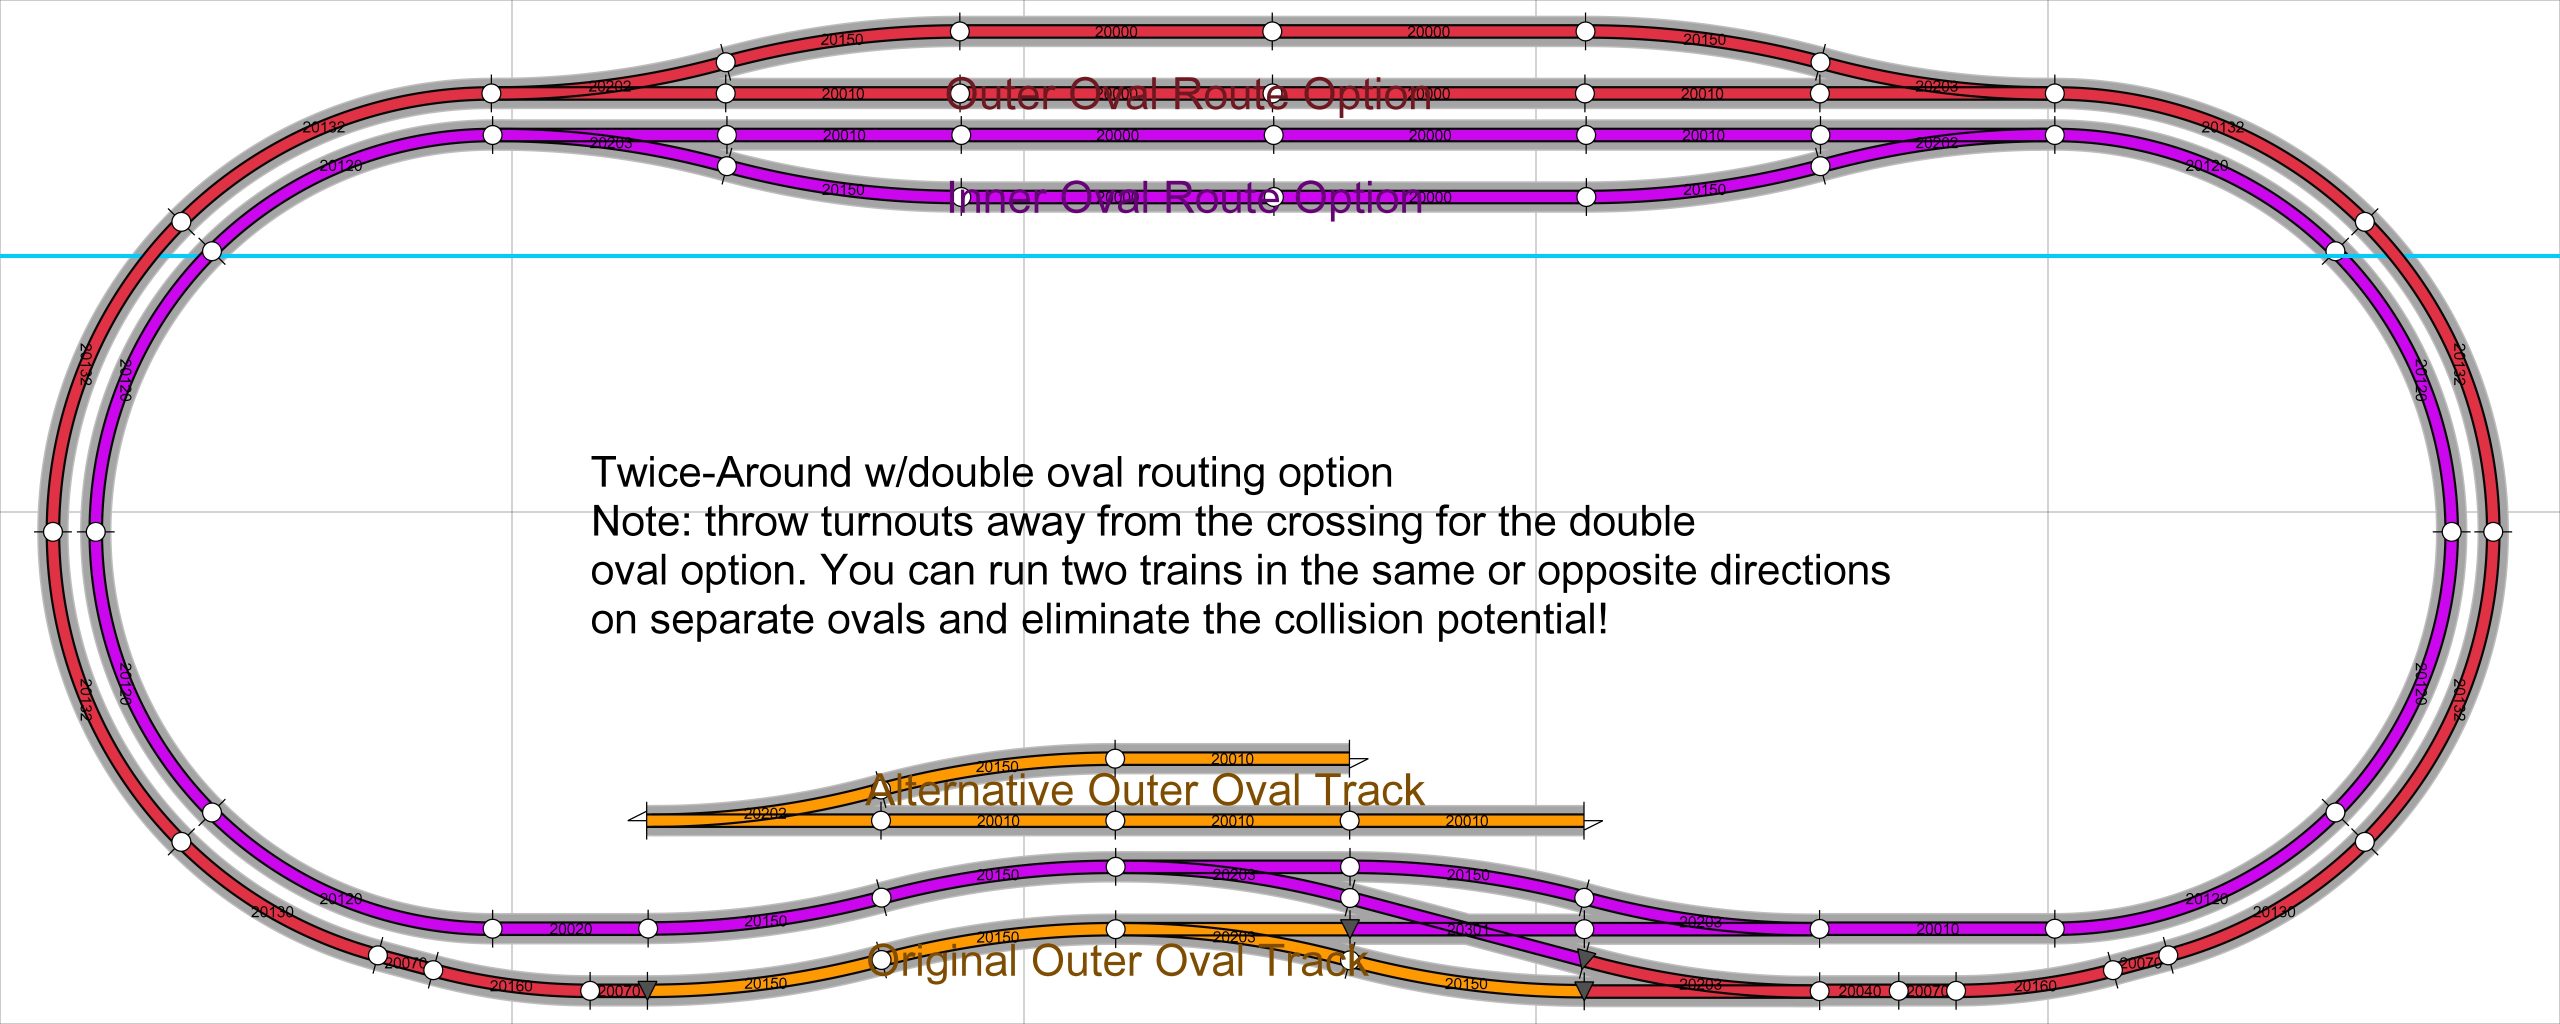
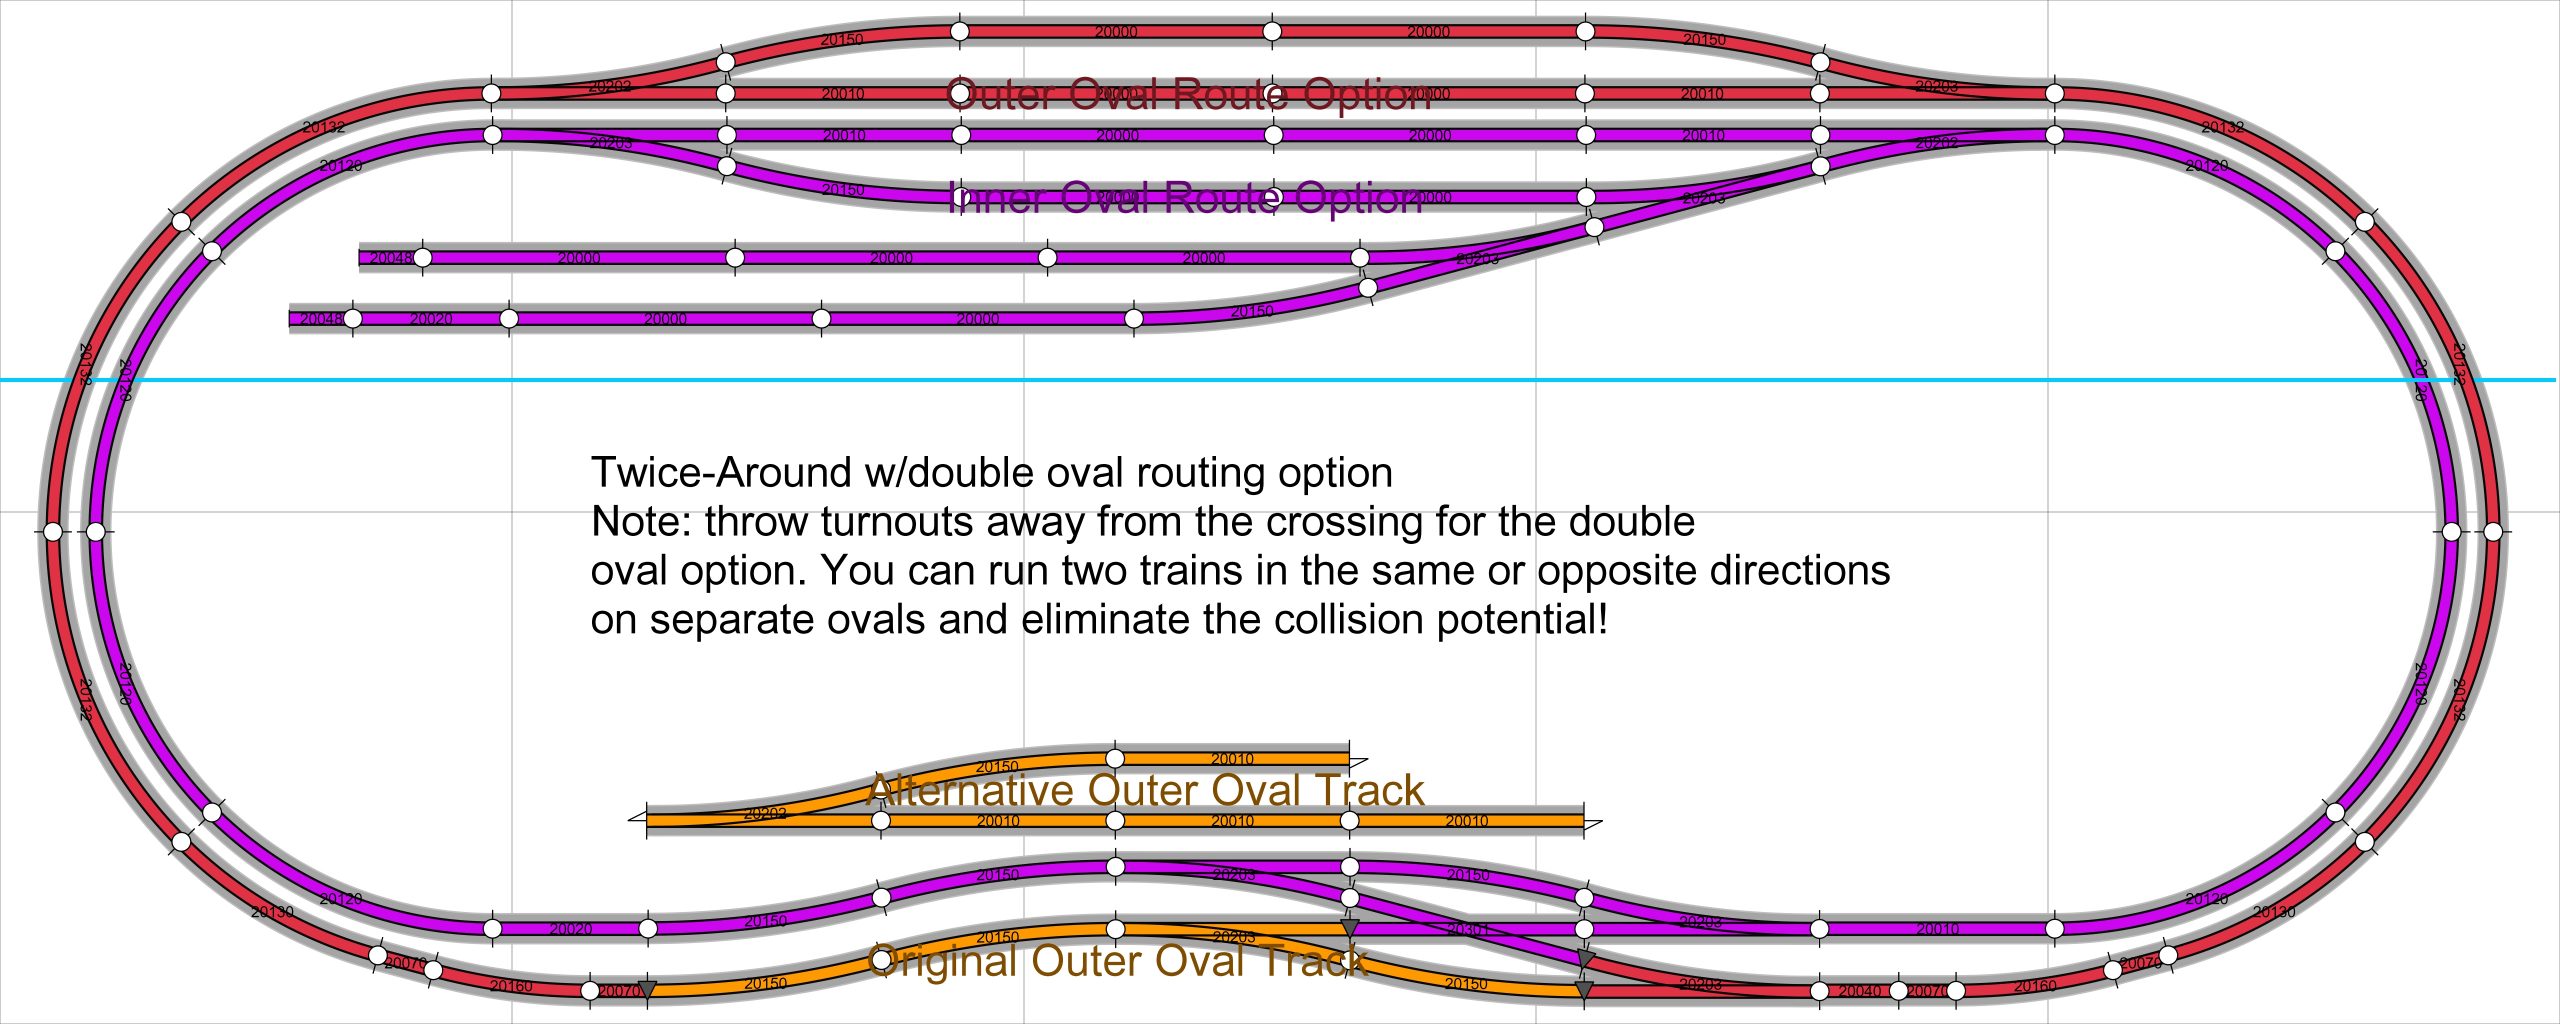
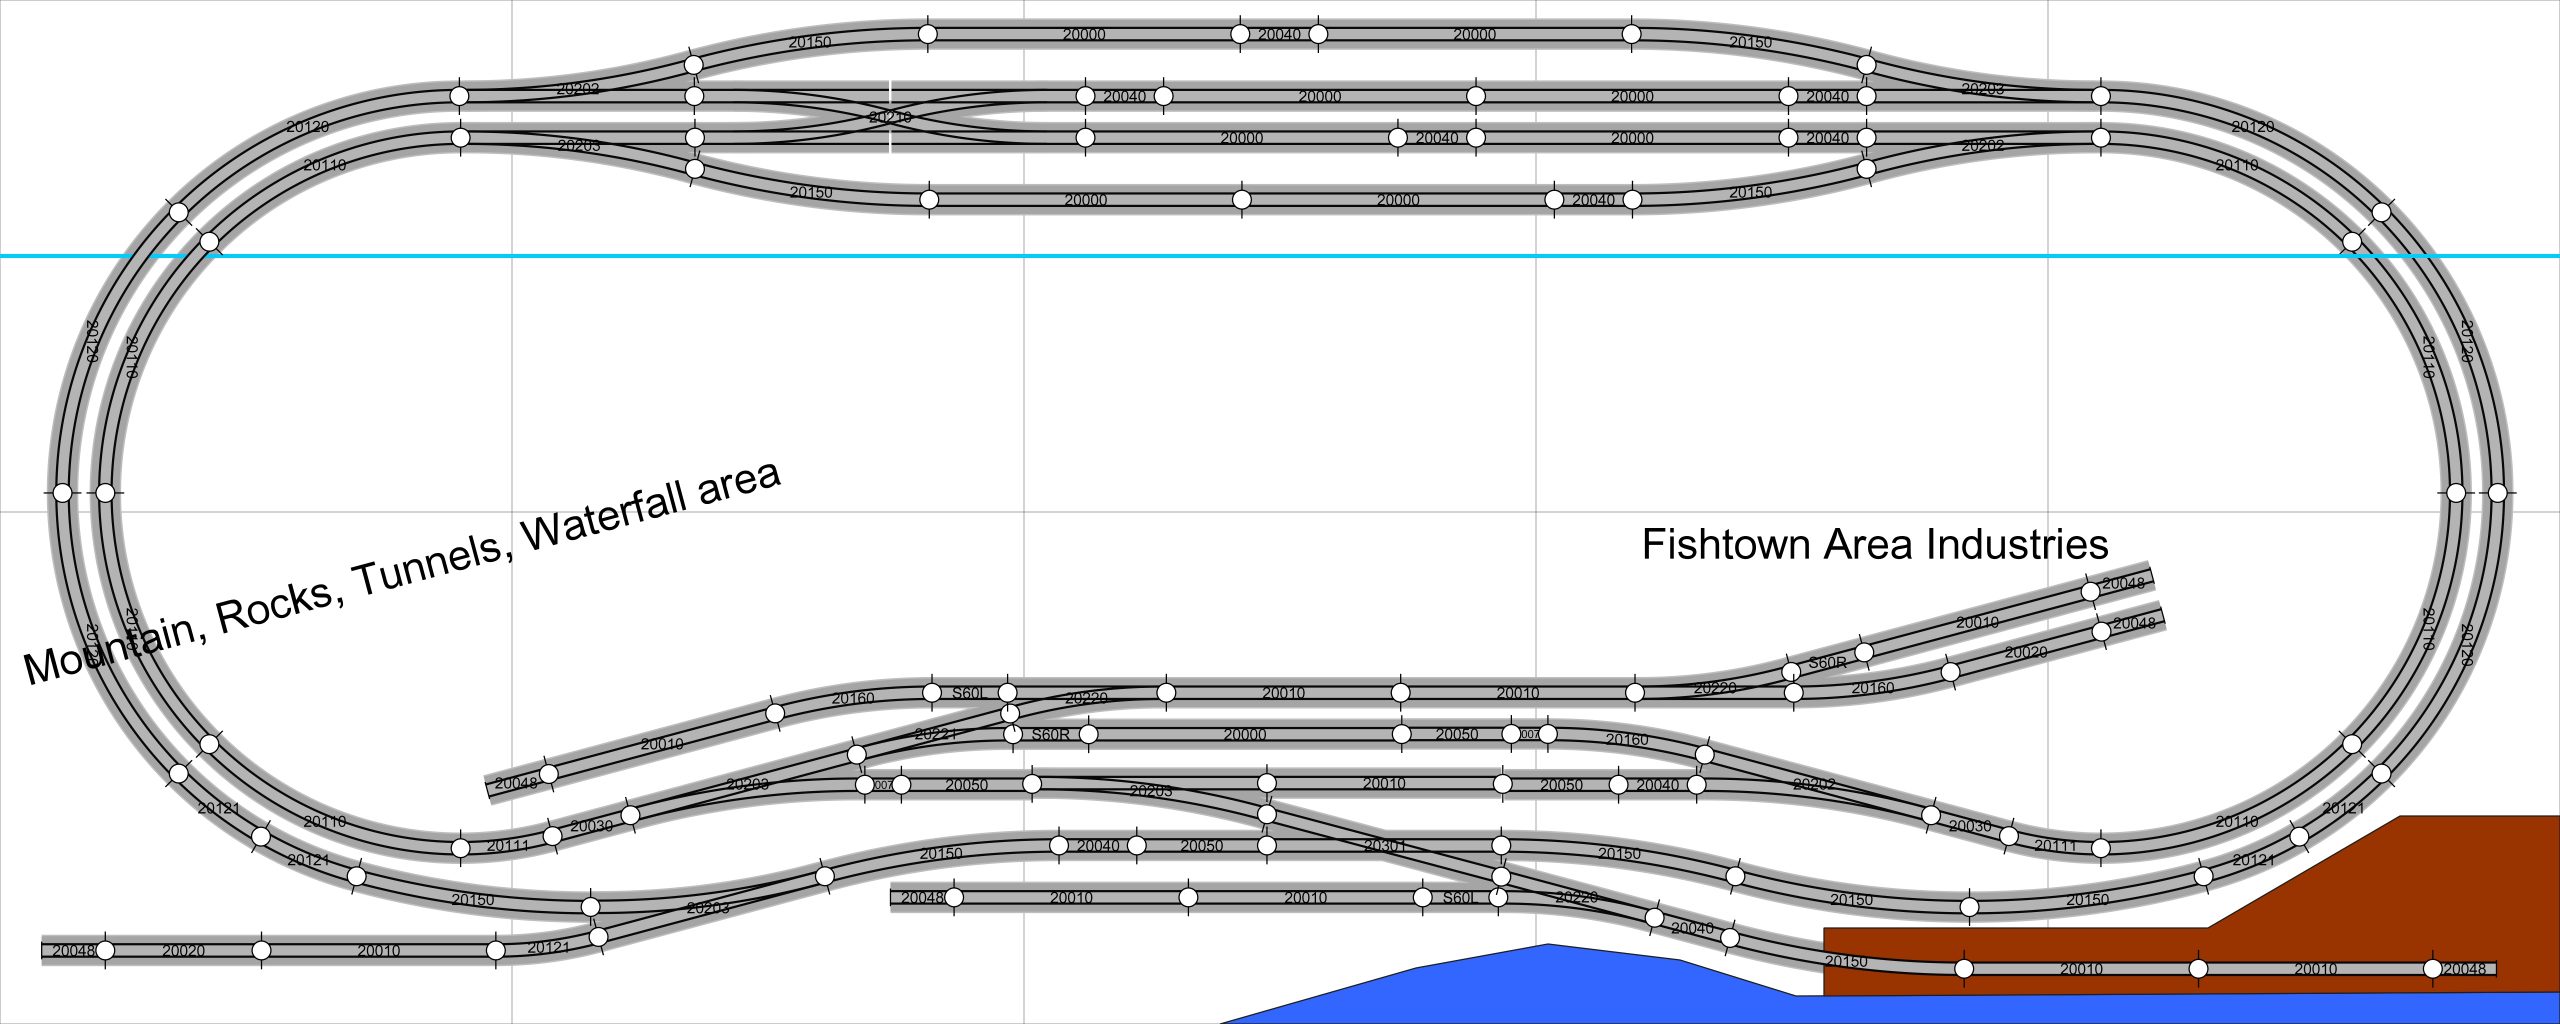
Second, I wanted to grab and hold the attention of young children so most of these designs incorporate features to allow two trains to run at the same time, at least one of which can run hands-off. They rely on a twice-around configuration for long continuous running of one train, but with crossovers to create two ovals that do not cross each other (no collisions!) which can also run continuously, providing the two-train, hands off running I wanted. I also wanted to allow for railroad-like operations so there are branch lines and switching and yard opportunities on many of the designs. The ovals help isolate stretches of track for operations purposes such as switching industries or making up trains, while keeping trains running elsewhere on the layout.
Third, I selected Kato Unitrack as my track product. It provides a finished look with ballasted roadbed and painted ties, and includes a wide selection of reliable and extremely easy to use track components, accessories and wiring if you want to stick with DC for your power. Unitrack provides a lot of flexibility in layout design once you understand the relationship between the track and turnout spacing and how to adjust curve radii. It’s also fairly easy to use Kato wiring components for DCC but you’ll need to substitute heavier wire for the track bus due to the higher current carried by DCC.
Fourth, I set standards to ensure smooth operation and minimize problems. All mainline track (track used for continuous running) will have no grade, i.e. it will be flat, with number 6 turnouts and a minimum radius of 12 3/8 inches (315 millimeters). Branch line track may have a grade of up to 3 percent with number 4 turnouts, and a minimum radius of 9 ¾ inches (249 millimeters). Yard track will also be flat with number 4 turnouts but a minimum radius of 11 inches (282 millimeters). Industrial sidings and spurs may use number 4 turnouts and a minimum radius of 9 ¾ inches (249 millimeters). Wherever possible I exceeded standards. In just a few cases I made some exceptions to suit the design.
Fifth, while not a design parameter, consideration of your locomotive purchases is important. If there is any possibility in the future that you may want to run more than one train at a time on your layout and have independent control of each train, plan to invest in DCC rather than attempt the complex block wiring necessary to run multiple trains at once with standard DC. As a rule, I buy locomotives that are DCC equipped, or at least DCC ready (you need to buy and install decoders in DCC-ready locomotives). DCC equipped and DCC ready locomotives will run on ordinary Direct Current (DC) with a standard power pack, so you don’t need to purchase DCC right away.
Let’s get started!
Here’s how to get a quick start. Find a train set, either freight or passenger, that makes a decent sized oval and includes a passing siding. A Kato starter set plus their V1 track set is perfect for this. Or if you already have trains, choose the Kato Unitrack M2 set. Either choice creates a long oval that fits on a door, uses 12 3/8 inch radius curves, and includes two number 6 turnouts to create a passing siding. Put the siding on the inside of the oval and you have a station stop for a small town.
Phase two, add a double crossover and an outer oval with 13 ¾ inch radius curves, Kato Unitrack sets V6 and V7. This does one very important thing. It gives you a way to run two trains at a time, one on each oval, or to run one train twice around by reversing the normal setting of the crossover. This will route the train through first one oval then the other.
Phase three, add a two-track railroad yard to the outside oval using Kato Unitrack set V4. Now you have room to break down and make up trains. The expanded basic plan shows how the parts from sets M2 (or the starter set plus V1), V4, V6 and V7 can be combined within the space available on the door. For a finished look (and to avoid derailments!), get a two pack of Kato Unitrack Type C bumpers (traditional American style) to end the two yard tracks.
At this point you’ll have enough track components to experiment with track plans other than the expanded basic plan if you so desire. Once you’ve taken time to experiment and have fun with different layouts you, your kids, or your grandkids should have a good idea of just how much interest you have in this hobby! If you’re excited, then it’s time to …
Get Serious About Having Fun!
Railroads on Doors
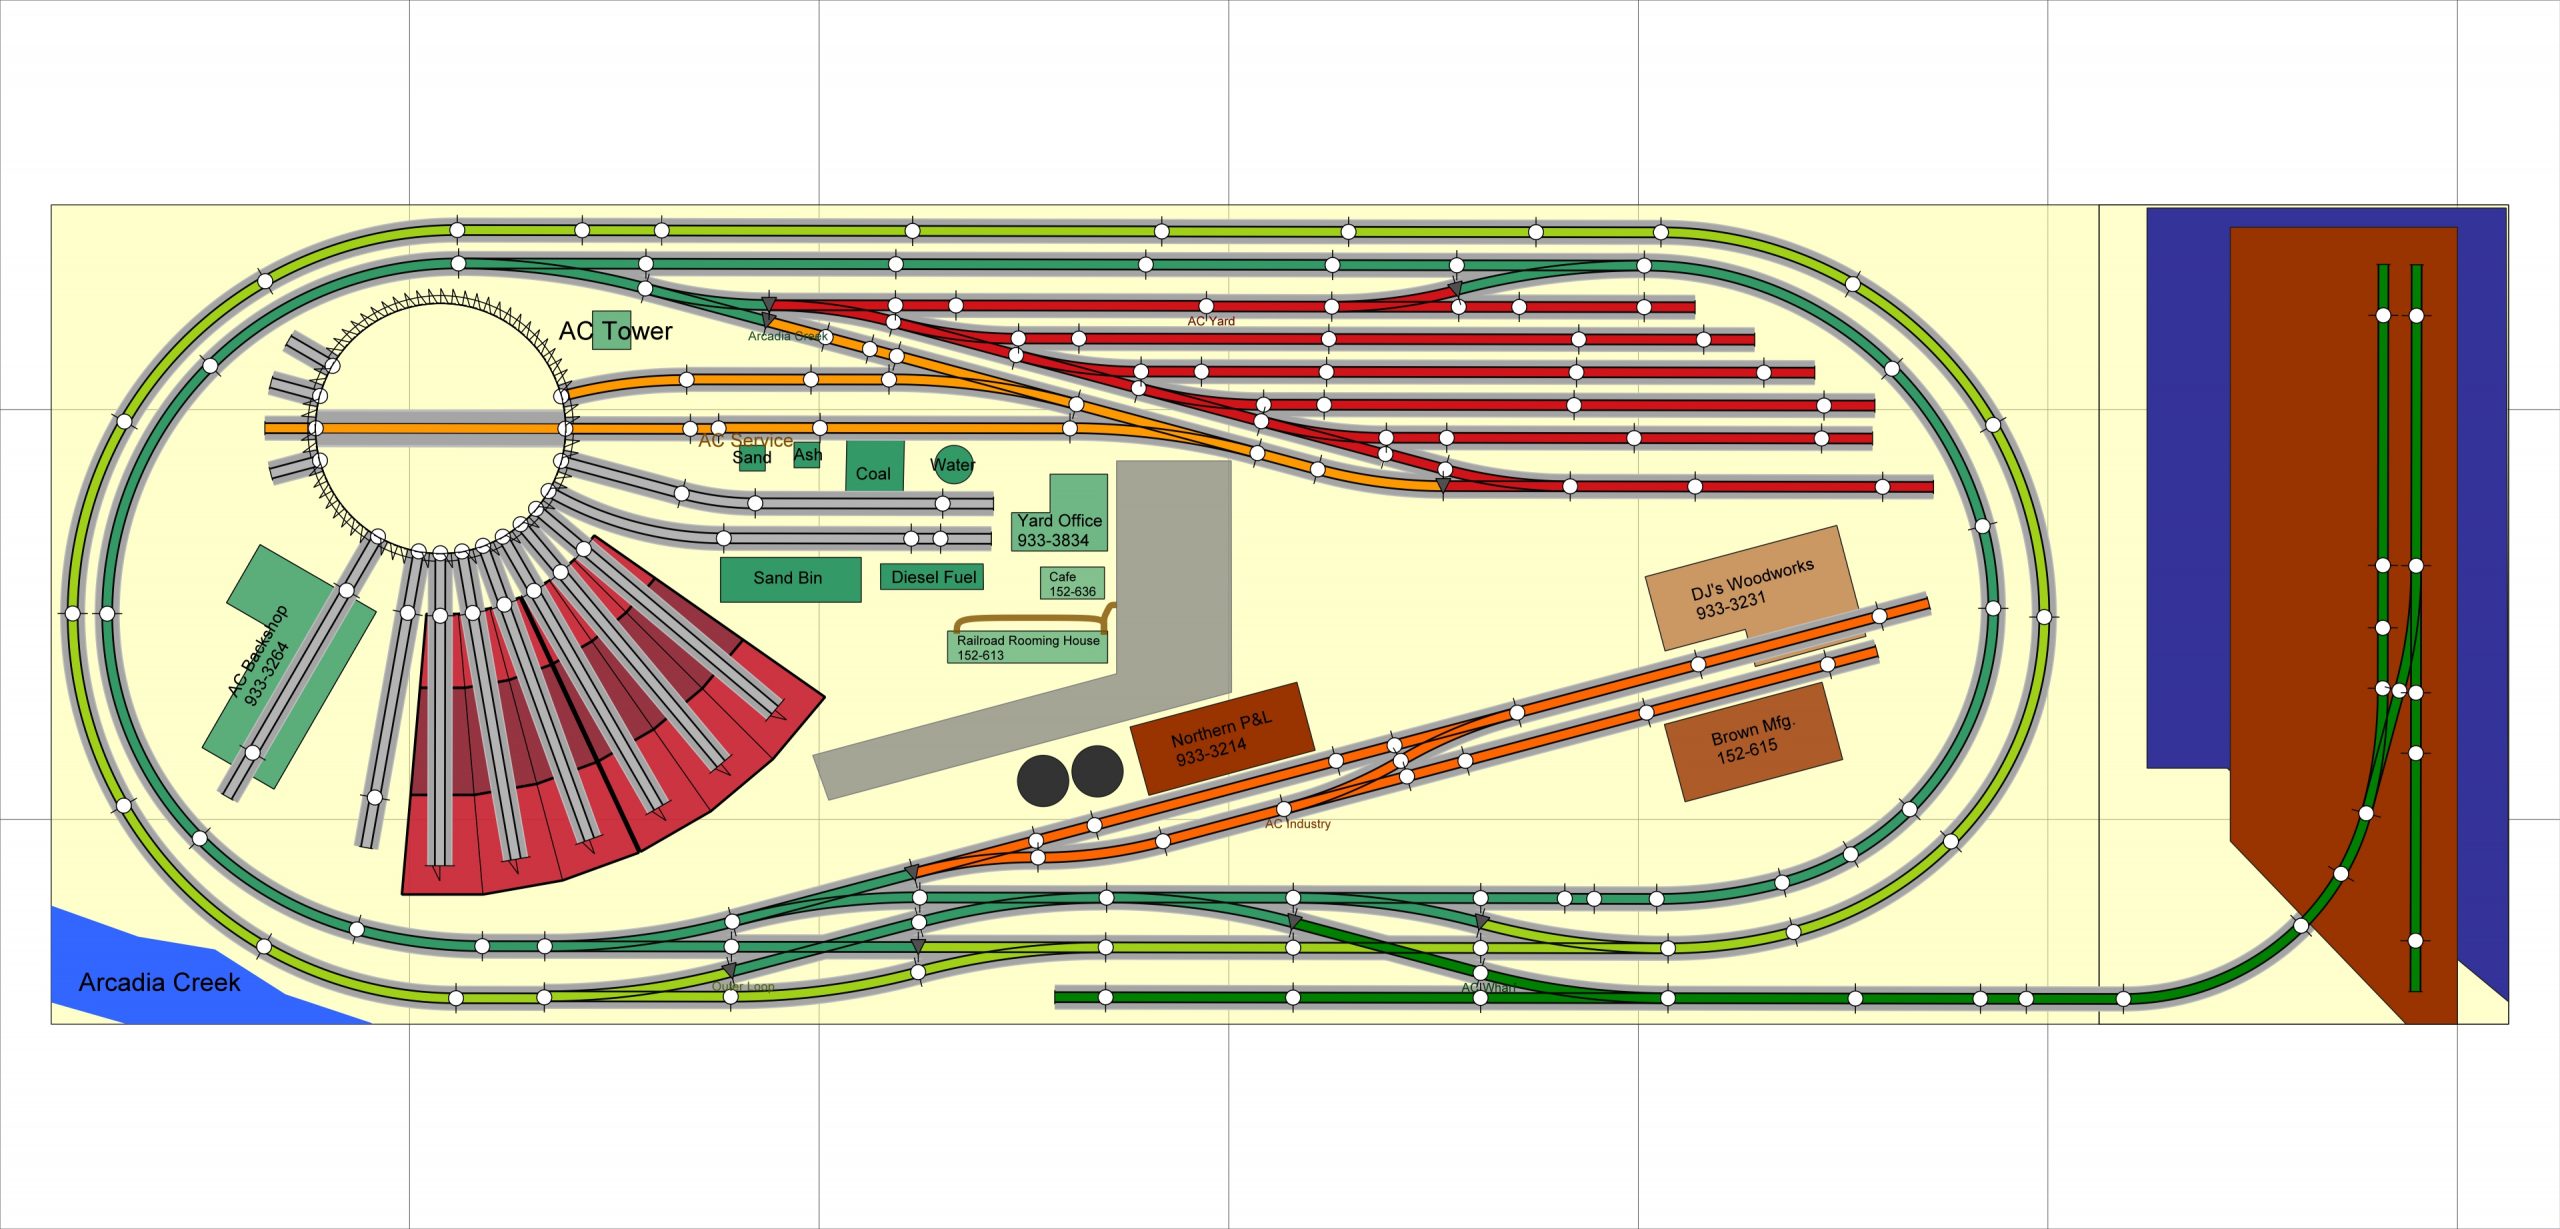
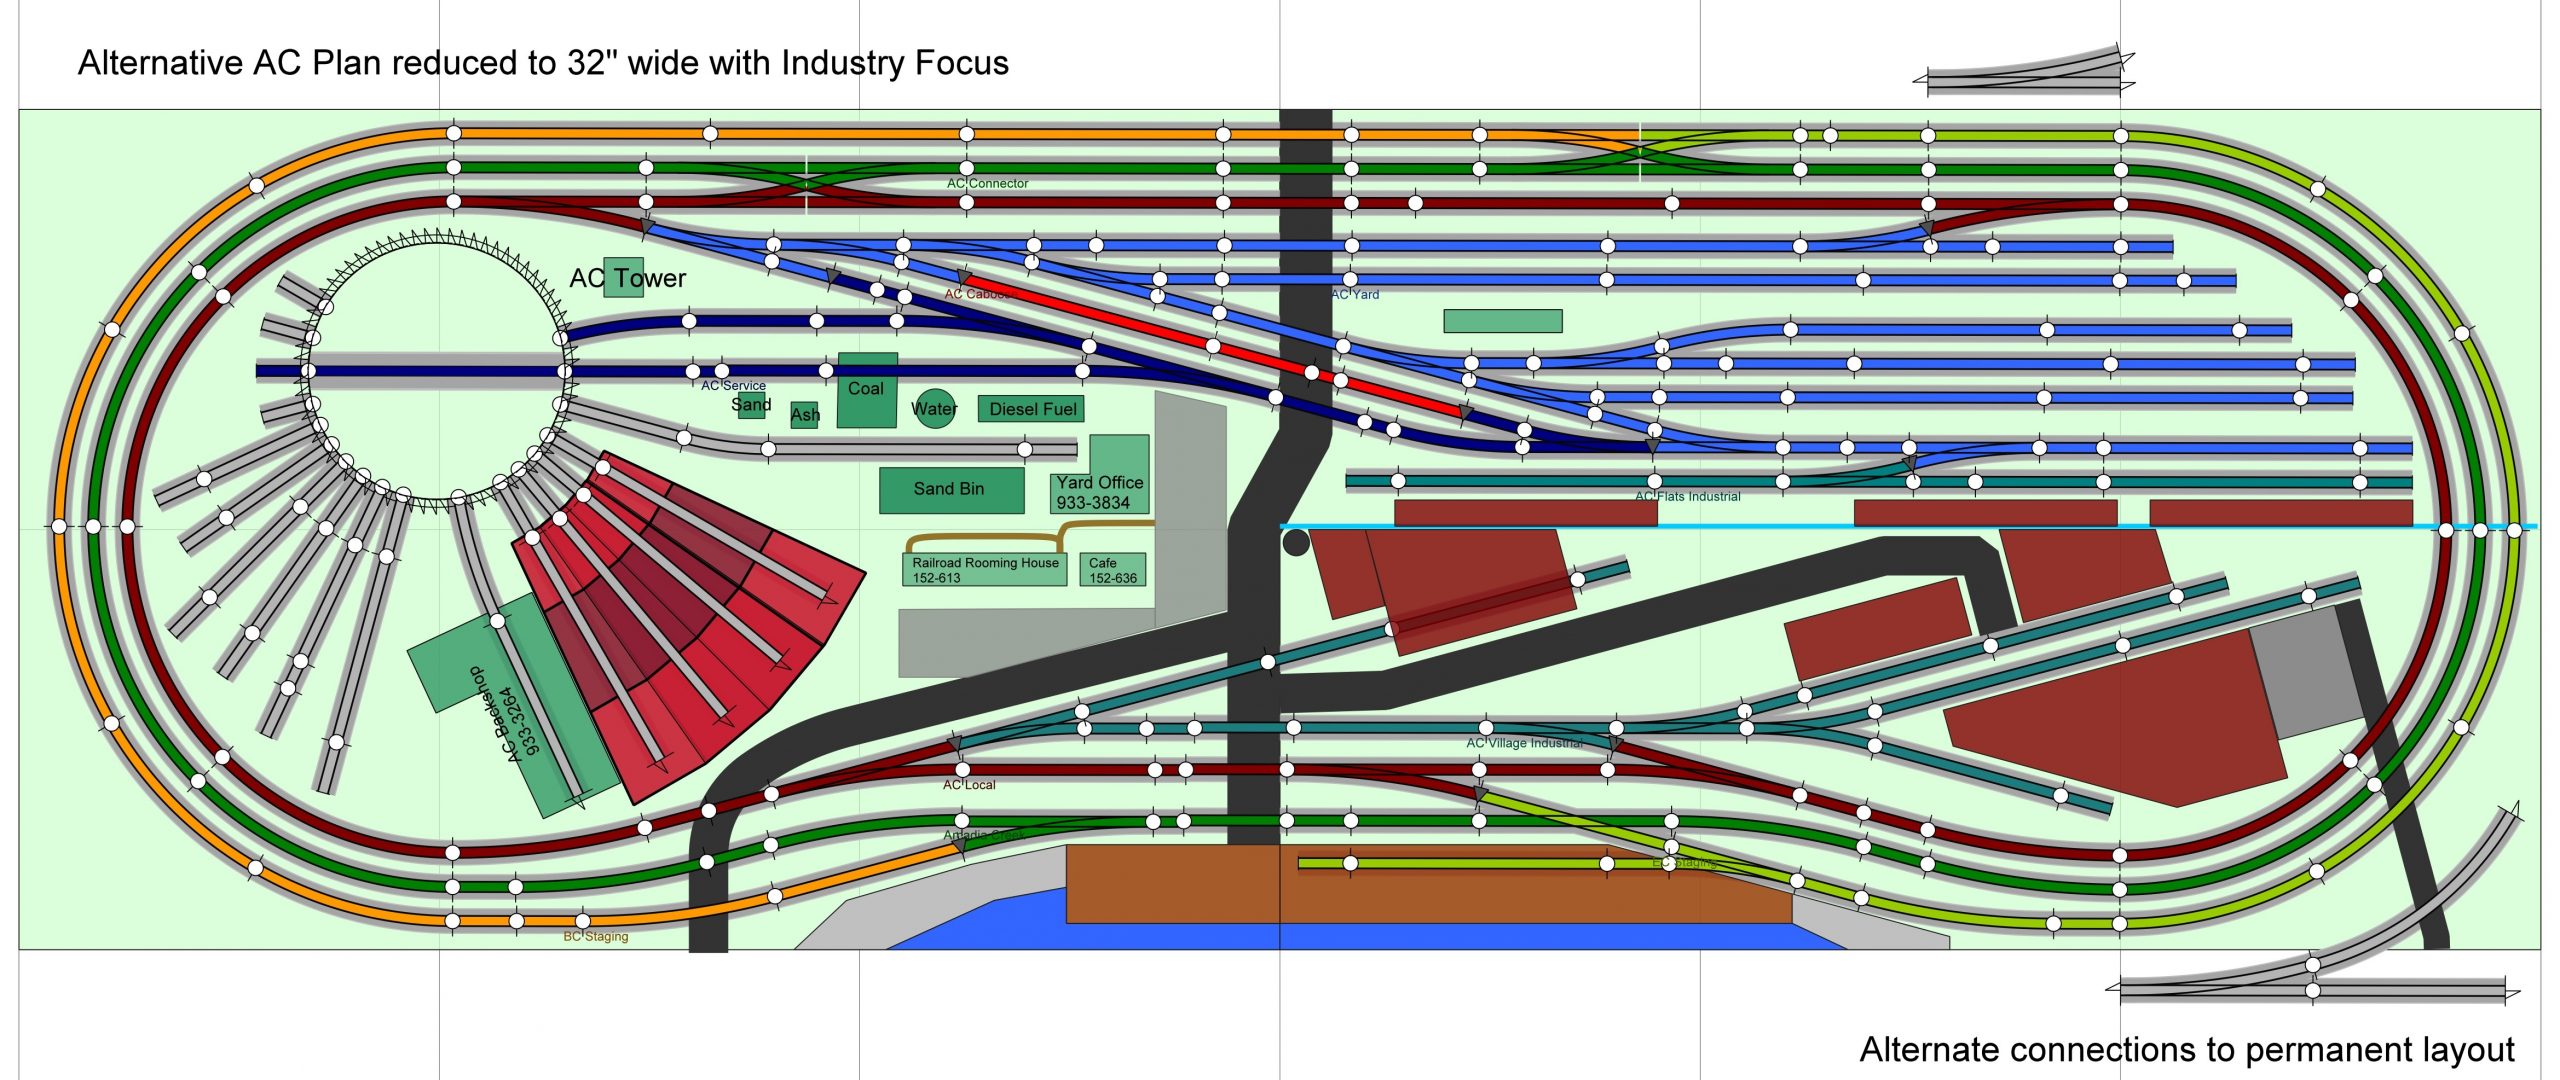
Here’s a collection of plans to get your creative juices flowing. Go ahead and experiment with track arrangements and come up with something that really works for you! If you need help or want the details for any of these plans jump over to my Contact page and email me! … Pops